 Skip to content

Summary |
| On Facebook, people can send you friend requests to become friends. If you accept, they can see your posts and pictures. When you sent friend requests on Facebook, the person can say yes or no. If they don’t reply, it’s “Pending,” meaning they haven’t decided yet. Before, having lots of Facebook friends was important, but now, too much can be overwhelming. If your friend list is too big or has people you don’t want, it’s time to clean it up. By canceling pending friend requests that aren’t helpful anymore, you control who sees your stuff. |

Source: How to Cancel Pending Friend Requests on Facebook
How to Cancel Pending Friend Requests on Facebook
You’re scrolling through your Facebook newsfeed when you notice a few pending friend requests from people you barely know or haven’t talked to in years.
While Facebook friendships once measured your social standing, many now see these as clutter that gets in the way of meaningful interactions.
If your friend list has ballooned out of control or includes people you’d rather not stay in touch with, it’s time for pruning. Read on to learn how to cancel those pending friend requests without hurting feelings.

Source: Friend Requests
Understanding Facebook Friend Requests
Facebook friend requests are when someone sent friend requests on Facebook app for you to become friends. Accepting a request lets that person see your posts, photos, and personal information.
What Does Pending Friend Request Mean on Facebook?
When your Facebook sent friend request, the recipient can accept or ignore it. If they don’t respond right away, the request will show as “Pending.” This means the person you sent the request to has not yet accepted or declined it.
Source: Pending Friend Requests
How to Cancel Pending Sent Friend Requests on Facebook
Once a request has been sent to you, it will appear in your Friend Requests folder for 14 days. Within that time, you can accept, ignore, or delete all pending friend requests Facebook has.
To cancel pending friend requests Facebook, follow these steps:
| Desktop Facebook Site | Facebook Mobile App |
|
|
:max_bytes(150000):strip_icc()/Cancelapp-4883d1f1c59b4cedad3a441376ff0df0.jpg)
Source: Cancel Pending Friend Requests
:max_bytes(150000):strip_icc()/Cancelapp-4883d1f1c59b4cedad3a441376ff0df0.jpg)
How to See Pending Friend Requests on Facebook
Checking your pending friend requests on Facebook is essential when you wish to cancel a friend request. Sometimes, you might sent friend request by mistake. It is either to someone you didn’t intend to or to change your mind about connecting with a person.
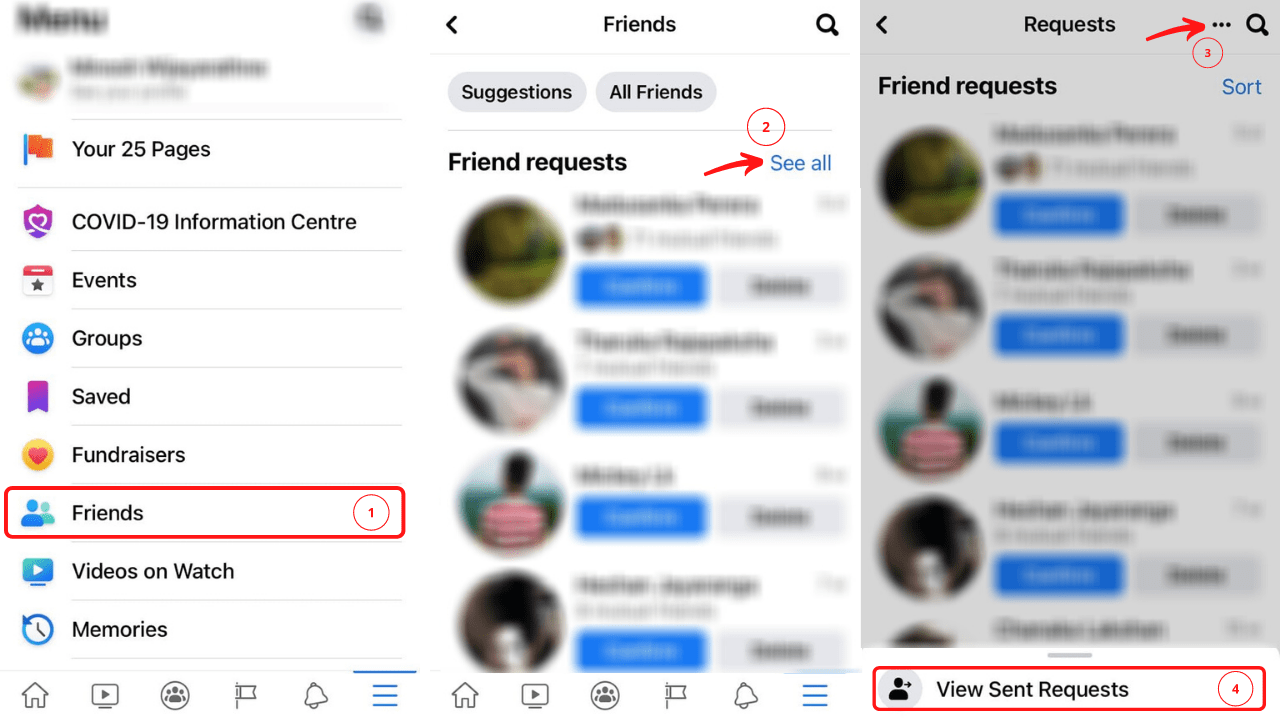
To see pending friend requests Facebook, follow these steps:
| Facebook Web | iOS/iPhone |
|
|

Source: Facebook
How Many Pending Friend Requests Can I Have on Facebook?
Facebook allows you to have up to 1,000 pending friend requests at a time. But, having too many requests can become overwhelming. So, it’s a good idea to go through and accept or decline requests.
Yet, pending unanswered friend requests can frustrate the sender and reflect poorly on you. People may think you’re ignoring them or don’t value their friendship. With that in mind, it’s best to respond to requests within a week or so of receiving them.

Source: Facebook Newsfeed
Unwritten Facebook Friend Request Rules
Facebook friend requests come with some unwritten rules of etiquette. Following these guidelines helps ensure your requests avoid awkward social situations:

Source: Add People You Know
1. Only Add People You Know
Accepting friend requests from strangers can affect your privacy and security. In fact, scammers often create fake profiles to send friend requests to get your personal information or install malware.
To be safe, never accept a request from someone claiming to be from a company. This might be under Facebook, a bank, or a government agency. Legitimate companies do not contact people through friend requests.
Remember to double-check the profile before accepting. Look for signs that could be fake, like a lack of photos, friends, or posts. See if you have mutual friends who could attest to the person. If something feels off, it’s best to ignore the request.

Source: Report Spammy Friend Requests
2. Report Spammy Friend Requests
If you receive friend requests that seem suspicious or spammy, you should report them to Facebook. This helps ensure a safe community for all users.
To report a pending friend request, simply:
- Go to your Facebook homepage.
- Click the Friend Requests option on the left menu.
- Locate the request you want to report and click the three dots in the upper right corner.
- Select “Report Spam or Scam” from the dropdown menu.
- Choose the option that best describes why you’re reporting the request.
- Click Submit.
You can report as many pending requests as needed. Facebook relies on user reports to help know and remove spam accounts. So, your reports make a difference in improving safety and quality on the platform.

Source: Review Pending Friend Requests
3. Review the Pending Friend Requests You Have Sent
It’s common to send a request to the wrong person or have second thoughts about connecting with someone. In these situations, having the option to review and manage your pending friend requests is valuable.
To do that, log into Facebook and click the friend requests icon (two silhouettes) at the top of your homepage. This will show you a list of the friend requests you have sent that are still pending.
Any requests that have been accepted will no longer appear on the list. Look through the names in your list of pending requests and see if you still wish to connect with each person. Some reasons you may want to cancel a request include:
- The recipient is someone you no longer wish to be friends with.
- You accidentally sent the request by mistake.
- The request has been pending for a long time with no response.
- Your circumstances have changed, and you no longer consider being friends appropriate.
- Your Facebook sent friend requests without permission.
:max_bytes(150000):strip_icc()/006-facebook-block-someone-4165789-18fb27042b3c44e0a00328794d7d9394.jpg)
Source: Block Pending Friend Requests
4. Block Pending Friend Requests From Strangers
On Facebook, you can control who can ask to be your friend. If you don’t set this, anyone can ask to be your friend.
To prevent unwanted friend requests from strangers on Facebook, you can block people before they send you a request. Here are the steps to block friend requests from strangers:
- Click on the Account menu (where your picture is) at the top right.
- Go to Settings & Privacy> Settings > Privacy.
- Under How People Find and Contact You, find Who can send you friend requests?
- Click Edit.
- You can choose Everyone or Friends of friends.
:max_bytes(150000):strip_icc()/A4-BlockFriendRequestsonFacebook-annotated-60e62b558c1c49089353a7a0be7d4a97.jpg)
Source: How to Hide Your Friend List
5. Hide Your Friends List
Keeping your online information secure is important. By hiding sensitive data like your friends list, you gain more control over your privacy and share details selectively.
Scroll to the top of your Facebook profile page and select the “Friends” option from the menu. This will bring up your full list of Facebook friends. At the top of the page, you’ll see the option to “Edit Privacy”. Select that option.
From there, you can choose who can see your friends list. The options include:
- Public: Anyone on or off Facebook can see your friends list.
- Friends: Only your Facebook friends can see your friends list.
- Only Me: Hides your friends list from everyone except you.
To hide your friends list from everyone, select “Only Me”. Once you save your new privacy settings, your friends list will be hidden from all other Facebook users. They will no longer be able to browse the names of people you are connected with on Facebook.
Master Your Friendships on Facebook
You have the power to curate your social connections on Facebook. By canceling pending friend requests that no longer serve you, you gain control over who has access to your profile and updates.
Choose to connect with intention and care for your digital well-being. Cancel those pending requests and craft an online community that energizes and inspires you. Your future Facebook self will thank you.
Ever find this content helpful? If yes, check out our additional blog posts on Intrinsic Writing Solutions.
- Your Guide to a Free Facebook Converter
- What Are Facebook Polls And How To Use Them – iWriting Solutions
- Beautiful Facebook Cover Photos Ideas – iWriting Solutions